Touch IME 使用在嵌入 WebKit 的場合
如果你想開發基於 HTML5 的桌面軟體,那麼 WebKit (libwebkit) 通常是你的第一選擇。關於這方面的基礎知識,可見「JavaScript 與 Desktop - WebKit」。當然也有使用 node.js 或是 Python 的。然後,我前陣子公開了一個以觸控螢幕為輸入設備,為 HTML5 應用所準備的 Touch IME (HTML5 觸控式輸入法)。由於 Touch IME 遵循 HTML5 規範設計,自然 Touch IME 可以和 WebKit 結合,作為 WebKit 桌面應用軟體的擴充項目,讓使用者擁有一個觸控式的中文輸入介面。本文示範如何無縫隙地結合 WebKit 與 Touch IME 。
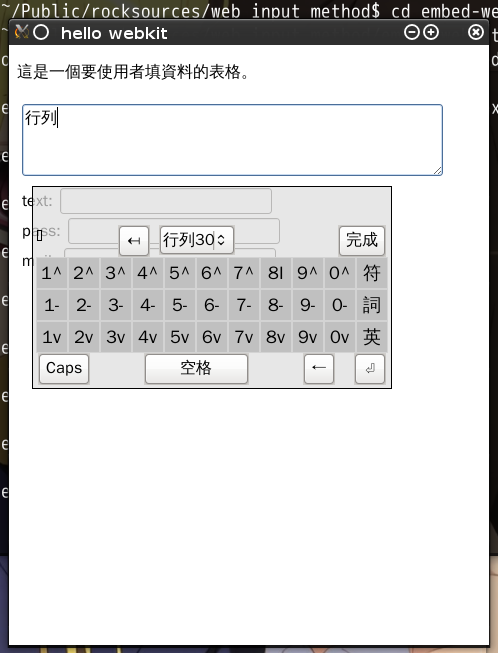
首先,我準備了一個簡單的資料表格(form2.html),當作桌面軟體中要讓使用者輸入資料的畫面。其內容如下:
<!DOCTYPE html>
<html>
<meta http-equiv="Content-Type" content="text/html; charset=UTF-8"/>
<p>
這是一個要使用者填資料的表格。
</p>
<textarea cols='40' rows='3' style="float:left;margin:5px;">
</textarea>
<div style="float:left;margin:5px;">
<labe>text: </labe><input type="text" /><br/>
<labe>pass: </labe><input type="password" /><br/>
<labe>mail: </labe><input type="email" /><br/>
</div>
</html>各位不難注意到,這裡面沒有半行跟 touch-ime 有關。這正是我的目的,因為我將示範如何無縫地將 touch-ime 置入使用。
接著, touch-ime 要求使用方提供它需要的輸入功能區(字根鍵區、功能鍵區、候選字區),而 form2.html 並沒有這些區域。我必須無中生有地生一個出來,on-screen-keyboard.js 就是在做這件事。
(function(){
// 將 OnScreenKeyboard 函數綁在 window 事件上,除了用於配置軟鍵盤外,還可藉由

// 被 window 參照的關係,使軟鍵盤個體不會被視為要回收的垃圾。

window.addEventListener('DOMContentLoaded',
function/*OnScreenKeyboard*/() {
    if (typeof(TouchInputMethod) == 'undefined')
        return;

    console.log('OnScreenKeyboard initial');
    var ctrl = TouchInputMethod.get_controls();

    var button_height = 'height:32px;';

    var kb = document.createElement('div');
    kb.innerHTML = '\
    <style type="text/css">\
    #'+ctrl.show_input_keys_id+' {\
        min-width: 5em; max-width: 8em;\
        float: left; clear: left;\
    }\
    #'+ctrl.show_input_keys_id+'::after {\
        content: "\1D104";\
    }\
    #'+ctrl.candidate_id+' {\
        clear: both;\
        height: 30px; max-width:320px;\
        overflow-x: hidden; overflow-y: auto;\
        margin-bottom: 5px;\
    }\
    .'+ctrl.control_classes.inputkey+' {\
        width: 32px; height: 32px;\
        max-width: 32px; max-height: 32px;\
        font-size: 18px;\
        padding: 0px; margin: 0px;\
        border: 1px solid lightgrey;\
    }\
    .'+ctrl.control_classes.candidates+' {\
        height: 30px; min-width: 29px; max-width: 300px;\
        font-size: 16px;\
        padding: 0px; margin: 0px;\
        border: 1px solid lightgrey;\
    }\
    .'+ctrl.control_classes.capital_toggle_on+' {\
        background-color: red;\
    }\
    </style>\
    <div>\
    <div id="'+ctrl.candidate_id+'"><!-- required --></div>\
    <div>\
     <div id="'+ctrl.show_input_keys_id+'"></div>\
     <button class="'+ctrl.control_classes.back_input_key+'" style="'+button_height+'">↤</button><!-- ↤ ⍅ ⍇ -->\
     <select class="'+ctrl.control_classes.select_engine+'" style="'+button_height+'"></select>\
      \
     <button class="'+ctrl.control_classes.end_composition+'" style="float:right;clear:right;'+button_height+'">完成</button>\
    </div>\
    <div id="'+ctrl.keyboard_id+'"><!-- required --></div>\
    <div style="text-align:center">\
     <button class="'+ctrl.control_classes.capital_toggle+'" style="float:left;clear:left;'+button_height+'">Caps</button>\
     <button class="'+ctrl.control_classes.add_space_output_texts+'" style="width:30%;'+button_height+'"> 空格 </button>\
     <span style="float:right;clear:right;">\
     <button class="'+ctrl.control_classes.backspace_output_texts+'" style="'+button_height+'">←</button>\
      \
     <button class="'+ctrl.control_classes.add_newline_output_texts+'" style="'+button_height+'">⏎</button>\
     </span>\
    </div>\
    </div>';

    with (kb.style) {
        backgroundColor = 'rgba(220,220,220,0.7)';
        border = '1px solid black';
        padding = '0.2em';
        position = 'absolute';
        visibility = 'hidden';
        zIndex = '99999';
    }

    var inputs = kb.getElementsByTagName('button');
    for (var i = 0; i < inputs.length; ++i)
        inputs[i].style.fontSize = '16px';
    kb.getElementsByTagName('select')[0].style.fontSize = '16px';

    document.getElementsByTagName('body')[0].appendChild(kb);

    var kb_x, kb_y;
    var being_dragged = false;
    var old_oncomposition = TouchInputMethod.oncomposition;
    var old_oncompositionend = TouchInputMethod.oncompositionend;

    TouchInputMethod.oncomposition = function() {
        var target = TouchInputMethod.get_target();
        kb.style.top = (target.offsetTop + target.offsetHeight + 10) + 'px';
        kb.style.left = (target.offsetLeft + 10) + 'px';
        kb.style.visibility = "visible";
        if (old_oncomposition)
            old_oncomposition.call(TouchInputMethod);
    }

    TouchInputMethod.oncompositionend = function() {
        kb.style.visibility = "hidden";
        if (old_oncompositionend)
            old_oncompositionend.call(TouchInputMethod);
    }

    kb.addEventListener('mousedown', function(ev){
        if (ev.target.nodeName != 'DIV' ||
            (ev.target.id == ctrl.candidate_id && ev.target.childElementCount > 0))
        {
            return;
        }
        //ev.preventDefault();

        ev.stopPropagation();
        being_dragged = true;
        kb_x = (ev.clientX - kb.offsetLeft);
        kb_y = (ev.clientY - kb.offsetTop);
    }, false);

    kb.addEventListener('mouseup', function(ev){
        //console.log('up', ev.target, ev.clientX, ev.clientY);

        if (!being_dragged)
            return;
        being_dragged = false;
        kb.style.left = ev.clientX - kb_x + 'px';
        kb.style.top = ev.clientY - kb_y + 'px';
    }, false);

    window.addEventListener('mousemove', function(ev){
        if (!being_dragged)
            return;
        kb.style.left = ev.clientX - kb_x + 'px';
        kb.style.top = ev.clientY - kb_y + 'px';
    }, false);

    TouchInputMethod.init();
}
, false);

})();
最後,我用 gjs 撰寫了一個簡單的嵌入 WebKit 的桌面程式 (host-ime.js):
#!/usr/bin/gjs
/*
$ ./host-ime.js file:///home/rock/Public/rocksources/web_input_method/embed-webkit-demo/form2.html
See JavaScript 與Desktop - Desktop and WebKit
http://blog.roodo.com/rocksaying/archives/14456843.html
*/
// apt-get install git1.0-gtk-2.0 gir1.0-webkit-1.0, gir1.0-soup-2.4
var GLib = imports.gi.GLib;
var Gtk = imports.gi.Gtk;
var WebKit = imports.gi.WebKit;
const WebKitLoadStatus = {
WEBKIT_LOAD_PROVISIONAL: 0,
WEBKIT_LOAD_COMMITTED: 1,
WEBKIT_LOAD_FINISHED: 2,
WEBKIT_LOAD_FIRST_VISUALLY_NON_EMPTY_LAYOUT: 3,
WEBKIT_LOAD_FAILED: 4
};
/* status order when load page:
PROVISIONAL -> COMMITTED
-> DOMContentLoaded (body.onload)
-> FIRST_VISUALLY_NON_EMPTY_LAYOUT -> FINISHED.
*/
function _script(f) {
var ctx = f.toString();
return ctx.slice(ctx.indexOf('{') + 1, ctx.lastIndexOf('}'));
}
function main() {
if (ARGV.length < 1) {
print("you must give an URL");
return;
}
GLib.set_prgname('hello webkit');
Gtk.init(0, null);
var w = new Gtk.Window();
w.connect("destroy", Gtk.main_quit);
var view = new WebKit.WebView();
view.set_size_request(480, 600);
view.get_settings().set_property('enable-file-access-from-file-uris', true);
view.connect("notify::load-status", function() {
//if (view.loadStatus == WebKitLoadStatus.WEBKIT_LOAD_FINISHED) {
if (view.loadStatus == WebKitLoadStatus.WEBKIT_LOAD_COMMITTED) {
var external_src;
external_src = GLib.file_get_contents('../touch-ime.js');
view.execute_script(external_src[1]);
/*
See 撰寫乾淨的 eval 程式碼的技巧
http://blog.roodo.com/rocksaying/archives/18991164.html
*/
view.execute_script(_script(function(){
if (document.URL.indexOf('file://') == 0)
TouchInputMethod.set_resources_path('file:///home/rock/Public/rocksources/web_input_method/');
else
TouchInputMethod.set_resources_path('http://localhost/rock/rocksources/web_input_method/');
}));
external_src = GLib.file_get_contents('../on-screen-keyboard.js');
view.execute_script(external_src[1]);
}
});
// WebKit: for security reason, you should give absolute path.
//view.load_uri("file:///home/rock/workspace/content/index.html");
//view.load_uri("http://www.twitter.com/");
view.load_uri(ARGV[0]);
w.add(view);
w.set_position(1); //GTK_WIN_POS_CENTER
w.show_all();
Gtk.main(); // gtk loop, quit by main_quit().
print("Goodbye");
}
main();gjs 是 GNOME3 底下一個 JavaScript 語言解譯器。它是冷門項目,大家可能不是那麼熟悉。但這裡的設計知識也可套用到 node.js 上。你只需要解決 node.js 如何建立視窗並引入 WebKit 的部份。至於 WebKit 的 API 和載入 touch-ime 的程式碼,則是共通的。
host-ime.js 有一個地方需要注意。我設計直接從本地檔案系統讀入 touch-ime 所需的資源,也就是用 file:// 協定讀檔。但 WebKit 預設關閉 file:// 功能,所以必須啟用 'enable-file-access-from-file-uris' 屬性 (見第43行)。
執行時, host-ime.js 需要一個 URL 作為參數,這個 URL 代表了 host-ime 將要運作的 HTML5 桌面程式。在此例中,自然是讓它開啟 form2.html 。
host-ime 會先調用 GTK 建立一個桌面視窗作為 WebKit 的容器。這也是 GTK 在此唯一的用途。接著調用 WebKit 建立一個新的 View 作為使用介面,將 View 放上視窗容器,讓 View 去執行 URL 指向的 HTML5 應用。在此又要注意一點,如同我們以往要動態地在 HTML 畫面上產生新的內容時,必須要等到畫面發生 'onload' 事件。 要用 gjs 往 WebKit 呈現的畫面增加新內容,也要等到 WebKit 處理完畫面內容後。這需要傾聽 WebKit View 的 'notify::load-status' 狀態,等待它的狀態變成 'WEBKIT_LOAD_COMMITTED' ,此狀態早於 HTML 畫面的 'onload' 事件。我在此直接從檔案系統讀入 touch-ime.js 和 on-screen-keyboard.js 的程式碼,交給 WebKit View 執行,此動作相當於 HTML 中的 <script src='...'>。最後,透過我在「撰寫乾淨的 eval 程式碼的技巧」所說明的技巧,將設置 touch-ime 的程式碼交付給 WebKit View 執行 (我在該文中所說的技巧,就是我一直用在 gjs 和 WebKit 之間互動的技巧)。到此就完成往 WebKit View 中置入 touch-ime 的工作了。
下圖是實際執行時的畫面:
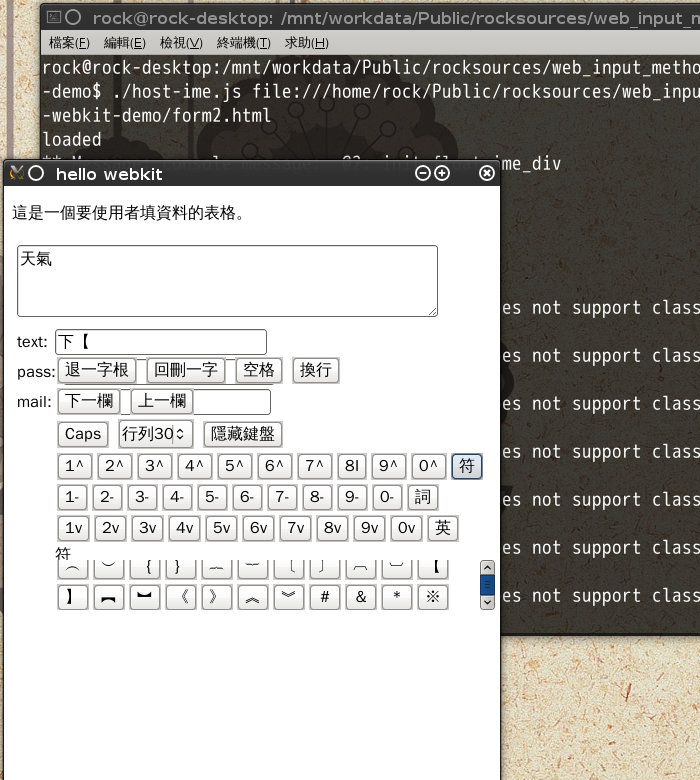
按「下一欄位」後跳往第二個輸入欄位, float-keyboard 也會跟著移動(此圖是舊版畫面。但因為有跳欄位功能,所以保留此畫面。)。 在輸入符號時,因為候選字太多超出候選字區的高度,所以會出現捲軸。 而在以觸控螢幕為輸入設備的環境中,使用者可以滑動候選字區挑字,所以候選字超出候選字區並不成問題。
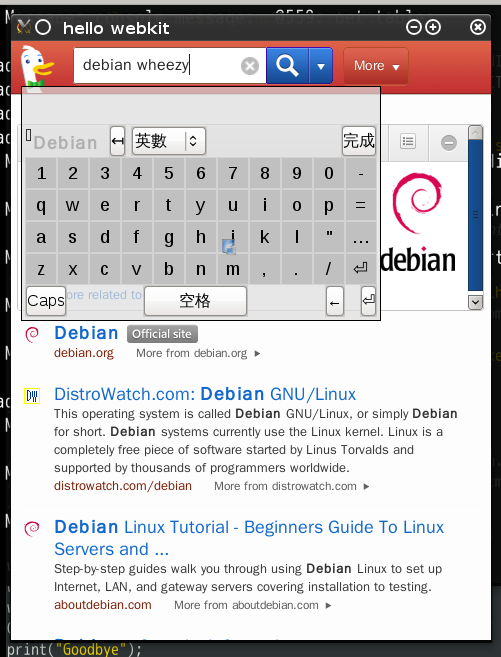
接著示範一下如何將現有的網頁服務當成桌面應用,如下圖。不過需要改一、兩行程式,就讓各位自己去玩了。
這個範例,最初是我在現職公司中,用來示範如何在嵌入 WebKit 的桌面程式調出系統的虛擬軟鍵盤(On-Screen keyboard)。當使用者點取輸入欄位時,就調出軟鍵盤,再透過軟鍵盤操作 ibus 輸入中文。當使用者離開輸入欄位時,就會隱藏軟鍵盤。這也是目前主要的移動設備作業系統所採用的輸入模式。不過其他人並不理解這要怎麼用。其實不懂也沒什麼,因為實作這種輸入模式的作業系統很普遍,例如 Android, Firefox OS, Tizen, Windows Phone 。
相對於系統的虛擬軟鍵盤,本文示範的 HTML 浮動鍵盤其實並不好用。虛擬軟鍵盤的好處在於,系統的視窗管理程式會改變輸入焦點視窗與軟鍵盤在整個螢幕上的佈局,又或者儘量讓軟鍵盤呈透明狀,避免軟鍵盤擋住輸入視窗。 而 HTML 浮動鍵盤雖然會儘量貼住輸入欄位,但位置有時並不理想,而且會擋住輸入視窗。雖然 on-screen-keyboard 可以拖動其位置,但仍免不了擋住設計者顯示在輸入區域的提示訊息,干擾使用者。
正是基於上述種種原因,所以我設計 touch-ime 時,就將鍵盤的放置工作完全交給 UI 設計者負責。事實上,為了提供使用者更好的使用經驗, Mobile App 或 Mobile Web 的設計者,都需要妥善地規劃文字輸入區域的佈局。再者,儘管系統的視窗管理程式會調整螢幕佈局,但這調整有時並不完美,所以也需要預留軟鍵盤的顯示區域。以 touch-ime 的使用經驗來看,我建議將它的鍵盤區域固定在輸入畫面的某一區域。
本文的程式碼,已存入 Touch IME 的源碼庫中,請見「embed-webkit-demo at touch-ime repo」。